File Management: Difference between revisions
No edit summary |
|||
| Line 1: | Line 1: | ||
= File Management (EN) = |
|||
We allow access over [[SSH]] exclusively; transferring files to the web host must happen over [[SFTP]]. |
We allow access over [[SSH]] exclusively; transferring files to the web host must happen over [[SFTP]]. |
||
The procedure is documented using FileZilla [https://filezilla-project.org/], since this is a populair multi-platform FTP client with good support for [[SFTP]]. |
The procedure is documented using FileZilla [https://filezilla-project.org/], since this is a populair multi-platform FTP client with good support for [[SFTP]]. |
||
= Connecting using FileZilla = |
== Connecting using FileZilla == |
||
As a first step, your [[SSH]] key must be entered in FileZilla. In principle, FileZilla works with keys in .ppk format (Putty keygen). If your key is already in .ppk (Putty) format, then that's fine. if not, FileZilla can convert it for you. |
As a first step, your [[SSH]] key must be entered in FileZilla. In principle, FileZilla works with keys in .ppk format (Putty keygen). If your key is already in .ppk (Putty) format, then that's fine. if not, FileZilla can convert it for you. |
||
| Line 21: | Line 22: | ||
* Save your site. You should be able to connect to it now (do not forget to turn on your [[VPN]] connection to VUB first!) |
* Save your site. You should be able to connect to it now (do not forget to turn on your [[VPN]] connection to VUB first!) |
||
= File system = |
== File system == |
||
When logging in over [[SFTP]], you will arrive in the directory: "/var/www/local/<name of your site>/ . This is your [[home directory]]. |
When logging in over [[SFTP]], you will arrive in the directory: "/var/www/local/<name of your site>/ . This is your [[home directory]]. |
||
| Line 37: | Line 38: | ||
*# Right click the file in the "remote" panel on the right, and choose "file attributes" |
*# Right click the file in the "remote" panel on the right, and choose "file attributes" |
||
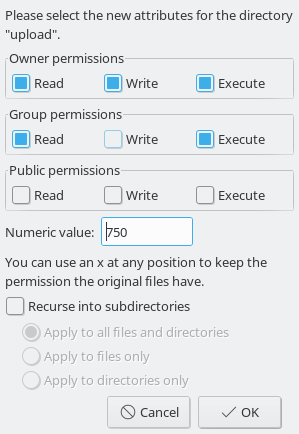
*# click the "write" box under "group permissions". <br /> [[File:Screenshot_filezilla_file_attributes.png]] |
*# click the "write" box under "group permissions". <br /> [[File:Screenshot_filezilla_file_attributes.png]] |
||
= File Management (NL) = |
|||
== Verbinden met FileZilla == |
|||
== File system == |
|||
Revision as of 11:00, 22 February 2018
File Management (EN)
We allow access over SSH exclusively; transferring files to the web host must happen over SFTP.
The procedure is documented using FileZilla [1], since this is a populair multi-platform FTP client with good support for SFTP.
Connecting using FileZilla
As a first step, your SSH key must be entered in FileZilla. In principle, FileZilla works with keys in .ppk format (Putty keygen). If your key is already in .ppk (Putty) format, then that's fine. if not, FileZilla can convert it for you.
Go to Edit -> Settings and SFTP, then click "Add key file..."
There, select your private (!) key file. If it is in PEM format (created by OpenSSH's "ssh-keygen" utility, common on Linux), FileZilla will ask you to convert it. Then, save your key with a file extention .ppk!

Once this happened, you can add a connection in FileZilla's site manager (File -> Site Manager).
- Normally, you will have received the host name in our instructions; at this moment, it is always "morse.vub.ac.be"
- Switch "protocol" to: "SFTP - SSH File Transfer Protocol"
- Set the "logon type" to "Key file"
- Fill in your user name as well
- The key file is the one you just finished creating
- Save your site. You should be able to connect to it now (do not forget to turn on your VPN connection to VUB first!)
File system
When logging in over SFTP, you will arrive in the directory: "/var/www/local/<name of your site>/ . This is your home directory.
In your home directory, there will be a directory called "www". The "www" directory is for your web site.
It is possible to put files in your home directory as well; the files you create (or upload) are only writeable by yourself. This has security reasons.
If you use a CMS such as Wordpress or Drupal, certain files and directories need to be writeable by the web server, either during installation or afterwards, to allow for uploading file through the CMS.
The procedure is uncomplicated: simply make the file or directory "grou writeable". This is a standard Unix permission and it works as follows:
- Each file on Linux or Unix has a user and a group owning the file. To both of these, the right to read, write to, or execute the file can be granted separately.
- It suffices to switch the write bit to "on" for the group permissions. in FileZilla, it goes like this:
- Right click the file in the "remote" panel on the right, and choose "file attributes"
- click the "write" box under "group permissions".