Difference between revisions of "SSH"
(→Introduction) |
(cleanup; ssh intro) |
||
| Line 1: | Line 1: | ||
= SSH (EN) = |
= SSH (EN) = |
||
== Introduction == |
== Introduction == |
||
| + | SSH means "Secure shell". Using SSH, it is possible access a command line on the web server. Using SSH has many afvantages: it is lightweight, it is designed with security as the most important criterium, it is supported on many platforms, and it is a well known method to manage computer systems from a distance. |
||
| + | |||
| + | for you, as a web hosting user, SSH is especially useful if you: |
||
| + | * want to modify [[cron]] jobs yourself |
||
| + | * have written scripts to automate certain aspects of your site |
||
| + | * wish to use programs such as [[CMS_Drupal|Drush]] or [[CMS_Wordpress|wp-cli]] |
||
== Generate SSH key pair == |
== Generate SSH key pair == |
||
| Line 6: | Line 12: | ||
=== Microsoft Windows === |
=== Microsoft Windows === |
||
'''Setting Up an SSH Session with SSH Keys in PuTTY''' |
'''Setting Up an SSH Session with SSH Keys in PuTTY''' |
||
| − | <pre style="white-space: pre-wrap; |
||
| − | white-space: -moz-pre-wrap; |
||
| − | white-space: -pre-wrap; |
||
| − | white-space: -o-pre-wrap; |
||
| − | word-wrap: break-word;"> |
||
When you recieve a confirmation from the hosting team that your public key has been added to your website on the webserver, we can use PuTTY (or whatever application that can use ssh with public keys) to connect to it. We will do this by setting up and saving a session. This way we will be able to quickly reconnect at a later time with all of our settings saved. |
When you recieve a confirmation from the hosting team that your public key has been added to your website on the webserver, we can use PuTTY (or whatever application that can use ssh with public keys) to connect to it. We will do this by setting up and saving a session. This way we will be able to quickly reconnect at a later time with all of our settings saved. |
||
Open PuTTY and click on the plus sign of the "SSH" category in the navigation menu: |
Open PuTTY and click on the plus sign of the "SSH" category in the navigation menu: |
||
| − | </pre> |
||
[[File:img1_ssh_tree_putty.png]] |
[[File:img1_ssh_tree_putty.png]] |
||
| − | <pre style="white-space: pre-wrap; |
||
| − | white-space: -moz-pre-wrap; |
||
| − | white-space: -pre-wrap; |
||
| − | white-space: -o-pre-wrap; |
||
| − | word-wrap: break-word;"> |
||
Within this category, click on the "Auth" sub-category. |
Within this category, click on the "Auth" sub-category. |
||
There is a field on this screen asking for the "Private key file for authentication". Click on the "Browse" button: |
There is a field on this screen asking for the "Private key file for authentication". Click on the "Browse" button: |
||
| + | |||
| − | </pre> |
||
[[File:img2_ssh_menu_putty.png]] |
[[File:img2_ssh_menu_putty.png]] |
||
| − | <pre style="white-space: pre-wrap; |
||
| − | white-space: -moz-pre-wrap; |
||
| − | white-space: -pre-wrap; |
||
| − | white-space: -o-pre-wrap; |
||
| − | word-wrap: break-word;"> |
||
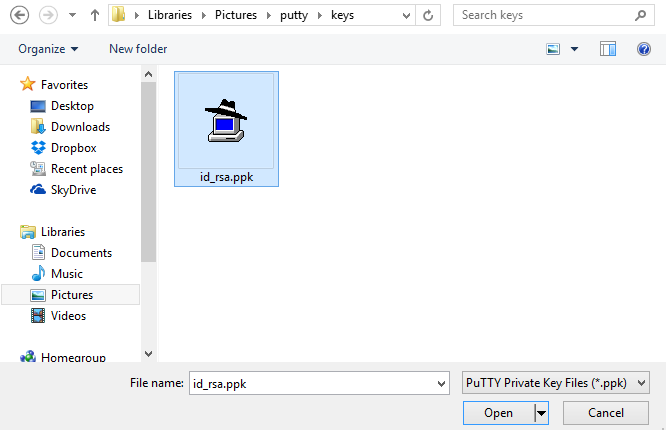
Search for the private key file that you saved. This is the key that ends in ".ppk". Find it and select "Open" in the file window: |
Search for the private key file that you saved. This is the key that ends in ".ppk". Find it and select "Open" in the file window: |
||
| + | |||
| − | </pre> |
||
[[File:img3_ssh_key_select.png]] |
[[File:img3_ssh_key_select.png]] |
||
| − | <pre style="white-space: pre-wrap; |
||
| − | white-space: -moz-pre-wrap; |
||
| − | white-space: -pre-wrap; |
||
| − | white-space: -o-pre-wrap; |
||
| − | word-wrap: break-word;"> |
||
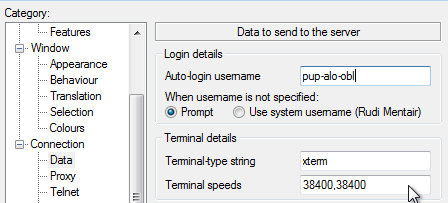
Next, in the Navigation menu, click on the plus sign of the “Connection” category. You will see a sub-menu with a sub-category “data”. Click on “Data” and then fill in the text box like here below. |
Next, in the Navigation menu, click on the plus sign of the “Connection” category. You will see a sub-menu with a sub-category “data”. Click on “Data” and then fill in the text box like here below. |
||
| + | |||
| − | </pre> |
||
[[File:img4_ssh_login.png]] |
[[File:img4_ssh_login.png]] |
||
| − | <pre style="white-space: pre-wrap; |
||
| − | white-space: -moz-pre-wrap; |
||
| − | white-space: -pre-wrap; |
||
| − | white-space: -o-pre-wrap; |
||
| − | word-wrap: break-word;"> |
||
The user to fill in is “<username>” |
The user to fill in is “<username>” |
||
| + | |||
| − | </pre> |
||
[[File:img5_ssh_login_full.png]] |
[[File:img5_ssh_login_full.png]] |
||
| − | <pre style="white-space: pre-wrap; |
||
| − | white-space: -moz-pre-wrap; |
||
| − | white-space: -pre-wrap; |
||
| − | white-space: -o-pre-wrap; |
||
| − | word-wrap: break-word;"> |
||
Now, in the navigation menu, we need to return to the "Session" category screen that we started at. |
Now, in the navigation menu, we need to return to the "Session" category screen that we started at. |
||
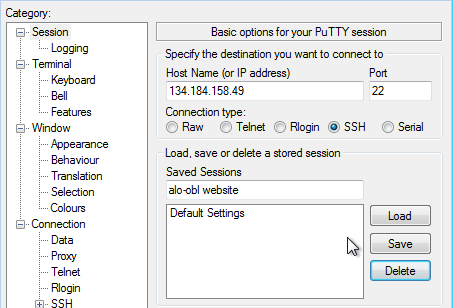
This time, we need to create a name for the session that we will be saving. This can be anything, so select something that will help you remember what this is for. |
This time, we need to create a name for the session that we will be saving. This can be anything, so select something that will help you remember what this is for. |
||
| + | |||
| − | </pre> |
||
[[File:img6_ssh_client.png]] |
[[File:img6_ssh_client.png]] |
||
| − | <pre style="white-space: pre-wrap; |
||
| − | white-space: -moz-pre-wrap; |
||
| − | white-space: -pre-wrap; |
||
| − | white-space: -o-pre-wrap; |
||
| − | word-wrap: break-word;"> |
||
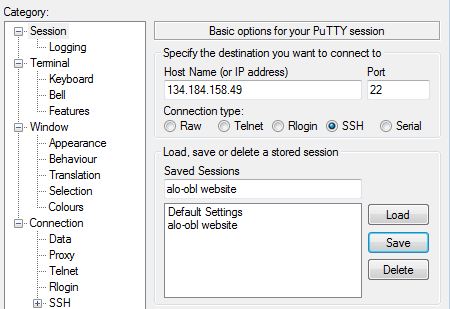
When you are finished, click on the "Save" button. |
When you are finished, click on the "Save" button. |
||
| + | |||
| − | </pre> |
||
[[File:img7_ssh_client2.png]] |
[[File:img7_ssh_client2.png]] |
||
| − | <pre style="white-space: pre-wrap; |
||
| − | white-space: -moz-pre-wrap; |
||
| − | white-space: -pre-wrap; |
||
| − | white-space: -o-pre-wrap; |
||
| − | word-wrap: break-word;"> |
||
You now have saved all of the configuration data needed to connect to your new server. |
You now have saved all of the configuration data needed to connect to your new server. |
||
| + | |||
| − | </pre> |
||
'''Connect to Your Server Using the Saved PuTTY Session''' |
'''Connect to Your Server Using the Saved PuTTY Session''' |
||
| − | <pre style="white-space: pre-wrap; |
||
| − | white-space: -moz-pre-wrap; |
||
| − | white-space: -pre-wrap; |
||
| − | white-space: -o-pre-wrap; |
||
| − | word-wrap: break-word;"> |
||
Now that you have your session saved, you can recall these values at any time by returning to the "Session" screen, selecting the session you would like to use in the "Saved Sessions" section, and click "Load" to recall the settings. |
Now that you have your session saved, you can recall these values at any time by returning to the "Session" screen, selecting the session you would like to use in the "Saved Sessions" section, and click "Load" to recall the settings. |
||
This will auto-fill all of the fields with the values you initially selected. |
This will auto-fill all of the fields with the values you initially selected. |
||
When you are ready to actually connect to your server, on the "Sessions" screen, click the button at the bottom that says "Open" after you have loaded your session: |
When you are ready to actually connect to your server, on the "Sessions" screen, click the button at the bottom that says "Open" after you have loaded your session: |
||
| + | |||
| − | </pre> |
||
[[File:img8_ssh_open.png]] |
[[File:img8_ssh_open.png]] |
||
| − | <pre style="white-space: pre-wrap; |
||
| − | white-space: -moz-pre-wrap; |
||
| − | white-space: -pre-wrap; |
||
| − | white-space: -o-pre-wrap; |
||
| − | word-wrap: break-word;"> |
||
The first time that you connect with the remote host, you will be asked to verify the identity of the remote server. This is expected the first time you connect to a new server, so you can select "Yes" to continue. |
The first time that you connect with the remote host, you will be asked to verify the identity of the remote server. This is expected the first time you connect to a new server, so you can select "Yes" to continue. |
||
| + | |||
| − | </pre> |
||
[[File:img9_ssh_warning.png]] |
[[File:img9_ssh_warning.png]] |
||
| − | <pre style="white-space: pre-wrap; |
||
| − | white-space: -moz-pre-wrap; |
||
| − | white-space: -pre-wrap; |
||
| − | white-space: -o-pre-wrap; |
||
| − | word-wrap: break-word;"> |
||
Afterwards, you should immediately be logged into your new server without ever having to type in a password |
Afterwards, you should immediately be logged into your new server without ever having to type in a password |
||
If you've gotten this far, you've successfully configured SSH keys with your web server! |
If you've gotten this far, you've successfully configured SSH keys with your web server! |
||
| + | |||
| − | </pre> |
||
= SSH (NL) = |
= SSH (NL) = |
||
| Line 118: | Line 68: | ||
* zelf [[cron]] jobs wil aanpassen |
* zelf [[cron]] jobs wil aanpassen |
||
* scripts hebt geschreven die bepaalde aspecten van uw site automatiseren |
* scripts hebt geschreven die bepaalde aspecten van uw site automatiseren |
||
| − | * u met programma's als [[Drush]] of [[wp-cli]] wenst te werken |
+ | * u met programma's als [[CMS_Drupal|Drush]] of [[CMS_Wordpress|wp-cli]] wenst te werken |
* ... |
* ... |
||
Revision as of 16:07, 28 February 2018
Contents
SSH (EN)
Introduction
SSH means "Secure shell". Using SSH, it is possible access a command line on the web server. Using SSH has many afvantages: it is lightweight, it is designed with security as the most important criterium, it is supported on many platforms, and it is a well known method to manage computer systems from a distance.
for you, as a web hosting user, SSH is especially useful if you:
- want to modify cron jobs yourself
- have written scripts to automate certain aspects of your site
- wish to use programs such as Drush or wp-cli
Generate SSH key pair
Linux
Microsoft Windows
Setting Up an SSH Session with SSH Keys in PuTTY When you recieve a confirmation from the hosting team that your public key has been added to your website on the webserver, we can use PuTTY (or whatever application that can use ssh with public keys) to connect to it. We will do this by setting up and saving a session. This way we will be able to quickly reconnect at a later time with all of our settings saved.
Open PuTTY and click on the plus sign of the "SSH" category in the navigation menu:
Within this category, click on the "Auth" sub-category. There is a field on this screen asking for the "Private key file for authentication". Click on the "Browse" button:
Search for the private key file that you saved. This is the key that ends in ".ppk". Find it and select "Open" in the file window:
Next, in the Navigation menu, click on the plus sign of the “Connection” category. You will see a sub-menu with a sub-category “data”. Click on “Data” and then fill in the text box like here below.
The user to fill in is “<username>”
Now, in the navigation menu, we need to return to the "Session" category screen that we started at. This time, we need to create a name for the session that we will be saving. This can be anything, so select something that will help you remember what this is for.
When you are finished, click on the "Save" button.
You now have saved all of the configuration data needed to connect to your new server.
Connect to Your Server Using the Saved PuTTY Session Now that you have your session saved, you can recall these values at any time by returning to the "Session" screen, selecting the session you would like to use in the "Saved Sessions" section, and click "Load" to recall the settings. This will auto-fill all of the fields with the values you initially selected. When you are ready to actually connect to your server, on the "Sessions" screen, click the button at the bottom that says "Open" after you have loaded your session:
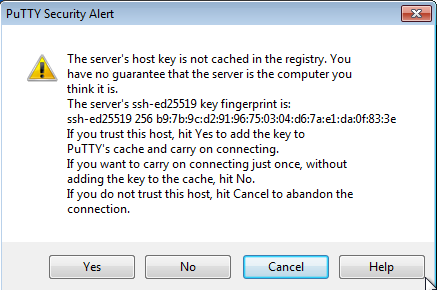
The first time that you connect with the remote host, you will be asked to verify the identity of the remote server. This is expected the first time you connect to a new server, so you can select "Yes" to continue.
Afterwards, you should immediately be logged into your new server without ever having to type in a password If you've gotten this far, you've successfully configured SSH keys with your web server!
SSH (NL)
Inleiding
SSH staat voor Secure Shell. Met SSH is het mogelijk een remote commandolijn te krijgen op onze webserver. SSH heeft tal van voordelen: het is licht in gebruik, ontworpen met veiligheid als belangrijkste vereiste, ondersteund op vele platformen, en een goed ingeburgerde manier om op afstand systemen te beheren.
SSH is voor u als hosting-gebruiker vooral nuttig indien u:


