Quickstart Guide
The purpose of this quickstart guide is to give researchers a basic tour of Pure and show them the quickest way to input their publication data and update their personal information.
First-time login and setup
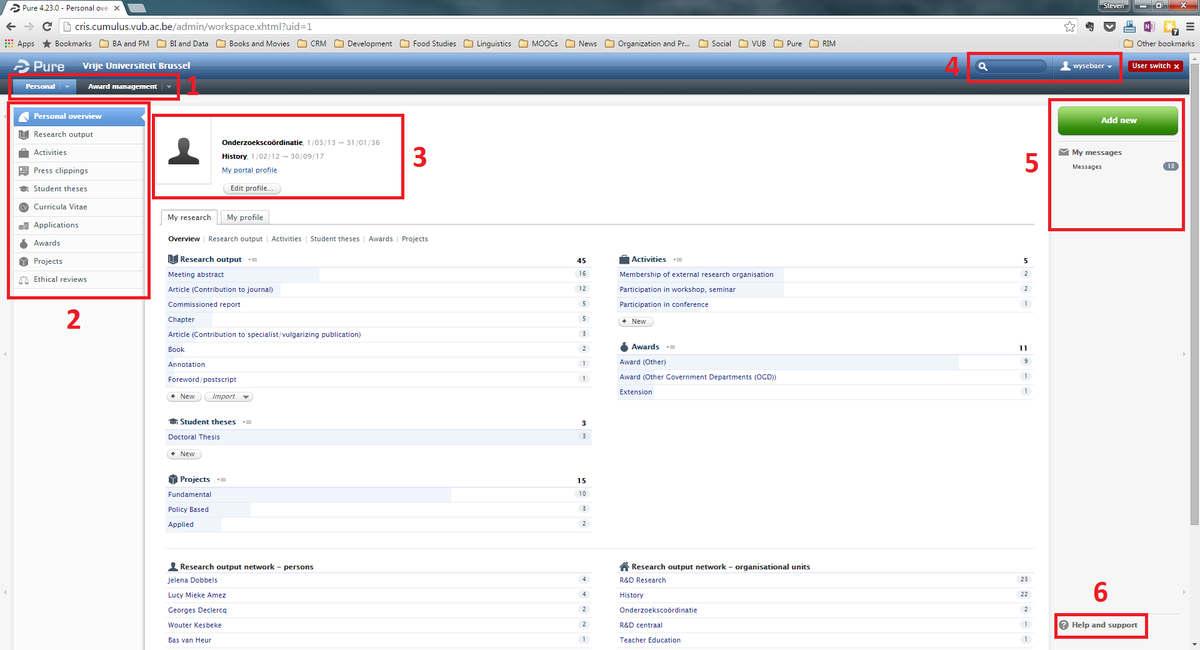
Authorized users can login through the login page. After logging in, a researcher without special permissions, should see a screen that looks like this:
The center of the interface is the working area, and changes depending on the type of content selected. The marked parts of the interface are:
- Modules: these are the modules to which the user has access. Researchers will work most, if not all, of the time in Personal. Users with additional permissions may have other tabs here, such as Editor, Master Data and Administrator.
- Objects: these contain the actual content entered by the researcher and grants read-access to other researchers' content in Pure. When hovering the cursor over these objects, a plus sign may appear. Clicking this plus sign allows researchers to add new content of that type.
- Personal information: this displays your active affiliations, personal details you have entered and a picture if you have added one to your profile. Adding this information is possible by clicking the Edit profile ... button.
- Search bar and user options: the search bar allows users to look through all their personal content, wildcards (such as * or ?) are generally not necessary. Clicking the user option button opens a pop-up window where some user settings can be modified.
- Communication panel: this panel contains links to messages sent by the systems or administrators, or tasks to be completed, if any (in the example, no tasks are waiting). Additionally, the big green Add new-button allows users to create new activities, research outputs or other editable objects.
- Help & support: here you find links to this wiki, to a number of screencasts and to the helpdesk's email.
Adjusting user settings
Pure allows users to modify a limited amount of user settings, mostly concerning system interaction. Note that there is a difference between user settings and the personal profile which allows for a much greater degree of customization. Users are people who can interact with the system, while persons are a much larger group (for example, students and retired employees still have person profiles, even though they no longer have user accounts).
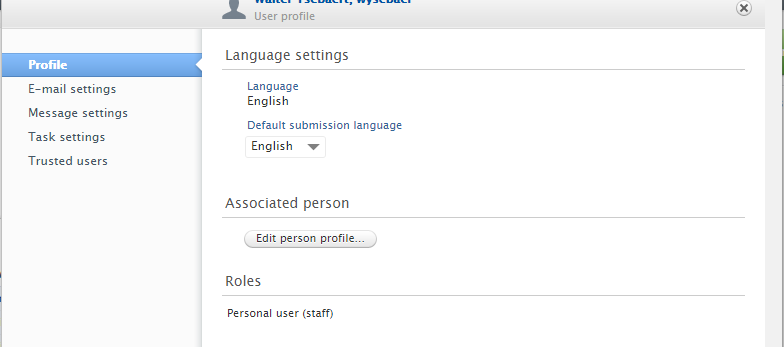
Clicking the user settings button shows this pop-up:
The profile menu allows you to jump to the person profile page (Edit person profile ...) and to set a default submission language. In most cases, this should be set to English. It can also be set to Dutch, but then the system will assume that all titles, subtitles etc. you enter are in Dutch. When selecting Dutch, the relevant field will be indicated with a Dutch flag (as opposed to a flag of the United Kingdom if English is selected).
E-mail settings determine in which circumstances Pure sends you information by e-mail. For most users, these settings should not be changed, as the default settings only generate e-mails most users want to see. If you do not want to receive any mails from Pure (if you log in frequently, for example), you can turn off the e-mails by going into this menu and change the settings from Mails are sent instantly to Mails are never sent.
Message settings work similar to e-mail settings, but instead of sending e-mails, the system sends messages within Pure. This is particularly helpful if you often work in Pure and find e-mails in your inbox annoying. Both messages and e-mails offer users the opportunity to jump to the object the message references. For example, if a validator sends you a message about a particular research output, a link that takes you to that research output is included within the e-mail or message.
Finally, tasks allow users to keep track of actions that still need to be taken. For researchers, the most common application is a task that reminds them of pending research output. Clicking this task shows all research output that, for some reason has not been validated.
The user profile also includes the option to designate a trusted user, which allows another Pure user to gain access to your account without the need to share password information.
Adding a new publication
There are three ways to add new a publication: 1) manual input, 2) import from external database such as Pubmed and 3) import from file (Bibtex or RIS). If you want to see if your publication is already in the system, navigate to Research Output > My research output. You will see a list of all research output in the system on which you have been indicated as an author or an editor. To start adding publications, either click the big green Add new button in the right upper corner of the screen or click the plus-sign on that appears when you hover the cursor over Research output in the lift sidebar. Choose whichever method of input you prefer. If you choose to create from template (i.e. manual input), select the right category in the menus that appear on the screen. After deciding which category in which you want to create a new publication, the right template will pop up on the screen. For the remainder of this guide, we will use the template for a journal article. Note that other categories may have different templates as other information is needed to identify and display the publication.
Fill out the template as indicated. Note that without additional permissions, the person creating the research output is always added as a contributor to the publication. If you need to add content for someone else, please send an e-mail to the helpdesk to set up the right permissions. When adding authors or editors, please make sure you use internal persons where appropriate. Throughout the years, many internal persons have been accidentally added as external persons. While we are trying to clean this up as much as possible, the sheer amount of duplicates makes this a long term effort. Start typing the name and look for the internal person (internal persons are indicated by a black icon, external persons are indicated by a white icon.
File:Internal External person.png
Pure's default setting shows all active affiliations on an internal person who is added to a publication. The affiliations shown on the record have no impact on funding mechanisms (the staff affiliation as registered at the HR department determines this), but they do determine on which pages of the portal the publication will be shown.

